
Carpentry Task Difficulty Estimator
Simple Butt Joint
Accurate angle
Basic Miter Cut
Precise 45° angle
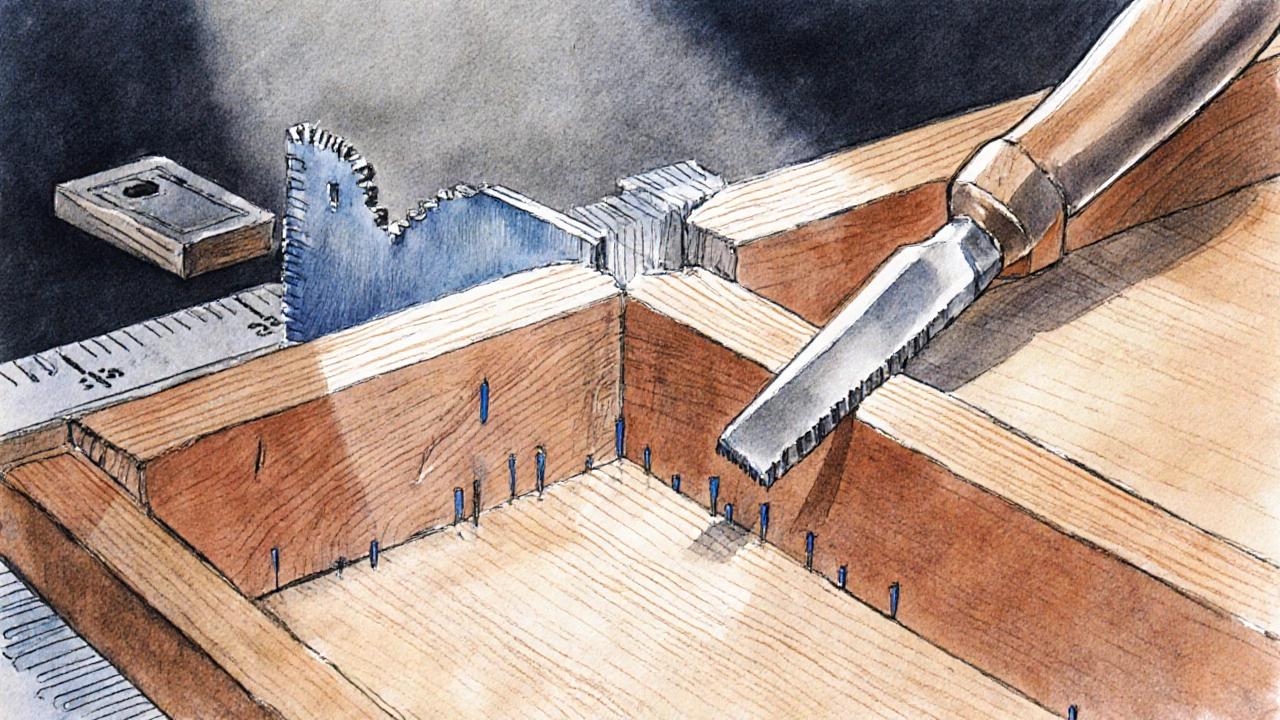
Dovetail Joint
Layout tolerance & grain control
Mortise-and-Tenon
Depth consistency & waste removal
Curved Laminated Panel
Accurate bending & glue-up
Task Details
Select a task from above to view details.
Difficulty Scale Explanation
1 = Easy | 5 = Moderate | 10 = Extremely Hard
The hardest carpentry tasks (like dovetails) require precise layout, accurate measurements, and mastery of hand techniques.
Most woodworkers swear they’ve finally nailed a project when they finish a piece that looks solid, fits perfectly, and holds up over time. Yet, there’s always that one hurdle that makes even seasoned carpenters break a sweat. Hardest carpentry task is the ultimate test of precision, patience, and problem‑solving.
Quick Takeaways
- Complex joinery - especially dovetail and mortise‑and‑tenon - tops the difficulty chart.
- Accurate layout and grain‑direction control are the hidden culprits behind most failures.
- Modern power tools help, but hand‑tool technique still decides the final fit.
- Safety gear and proper ergonomics prevent injuries when you push the limits.
- Practice, incremental learning, and the right setup turn the hardest task into a repeatable skill.
Why Complex Joinery Is the Real Beast
When you hear the phrase hardest carpentry task, most seasoned carpenters point straight to complex joinery. Two classic examples dominate the conversation:
- Dovetail joint is a interlocking connection used in drawers, cabinets, and fine furniture. Its strength comes from the mechanical lock created by alternating ‘tails’ and ‘pins’ that resist pulling apart.
- Mortise and tenon is a time‑tested joint where a rectangular ‘tenon’ fits into a matching ‘mortise’ cavity, delivering massive load‑bearing capacity for frames, tables, and doors.
Both joints demand flawless layout, precise cutting, and an eye for grain direction. Miss one step, and you end up with gaps, split wood, or a joint that can’t bear weight. The difficulty isn’t just in the cuts; it’s in keeping the wood’s natural tendencies in check.
Layout and Measuring: The Silent Failure Points
Before the saw even bites, the layout stage decides the outcome. Carpentry layout involves marking cut lines, joint locations, and reference points with a combination of marking knives, pencils, and layout squares.
Even a 0.5mm deviation in a dovetail’s pin width can cause the joint to jam or leave a visible gap. That tiny error usually stems from one of three issues:
- Inaccurate measuring tools - a worn ruler or a dull marking knife.
- Poor technique - pressing too hard or sliding the marking knife at an angle.
- Ignoring wood grain - cutting across grain can cause the wood to split or drift.
Investing in a high‑quality Marking gauge and regularly calibrating your measuring tape keep those tiny errors in check.
Tools of the Trade: Hand Versus Power
Many think a powerful router or CNC machine automatically solves the hardest tasks. While they speed up material removal, they cannot replace the tactile feedback of a hand plane or dovetail saw.
- Hand plane lets you shave wood millimetre by millimetre, feeling the grain’s resistance and adjusting pressure instantly.
- A Router with a high‑quality bearing‑guided bit can produce repeatable mortise sockets, but setting the depth and ensuring the bit stays true to the grain still requires meticulous setup.
The sweet spot is a hybrid approach: rough out the joint with power tools, then finish with hand tools for that razor‑thin tolerance.
Grain Direction and Wood Species: Nature’s Curveballs
Even the best‑trained hand can be tripped up by wood that refuses to cooperate. Wood grain runs in patterns that affect strength, split resistance, and how the material reacts to cutting forces.
Hard‑maple, for example, holds a joint tightly but is notorious for chip‑out when using a chisel on a tight dovetail. Soft‑woods like pine are forgiving on the tool side but may compress under load, leading to joint creep.
Understanding the species you’re working with and always marking the grain direction before you cut reduces surprise failures dramatically.
Safety and Ergonomics: Staying in the Game
When you’re pushing the limits of precision, fatigue creeps in fast. A tired wrist can cause a mis‑cut, and a slipped grip on a saw can turn a hobby into a medical case. The following safety practices keep you safe while you tackle the hardest tasks:
- Wear Safety goggles and hearing protection whenever using power tools.
- Use a sturdy workbench with clamps to secure the workpiece - never rely on hand pressure alone.
- Maintain neutral wrist posture; use a padded bench vise if you need extra leverage.
- Take short breaks every 30‑45 minutes to avoid muscle strain.
Comparison: Difficulty Rating of Common Carpentry Tasks
| Task | Difficulty (1‑10) | Key Challenge | Typical Toolset |
|---|---|---|---|
| Simple butt joint | 2 | Accurate angle | Hammer, nails, clamps |
| Basic mitre cut | 4 | Precise 45° angle | Mitre saw, mitre box |
| Dovetail joint | 9 | Layout tolerance & grain control | Dovetail saw, chisels, marking gauge |
| Mortise‑and‑tenon | 8 | Depth consistency & waste removal | Router, mortising jig, hand chisel |
| Curved laminated panel | 7 | Accurate bending & glue‑up | Strap clamps, flexible plywood |
Practical Tips to Tame the Hardest Task
Below are bite‑size actions you can add to your workflow right now:
- Dry‑fit before glue. Assemble the joint without adhesive to spot gaps early.
- Use a Marking knife with a fresh blade for crisp lines that don’t bleed into the wood grain.
- Cut the tenon slightly undersized (about 0.2mm) and sand to a perfect fit; this prevents splitting.
- When routing a mortise, make a shallow “wiggle” pass first, then deepen gradually - it reduces tear‑out.
- Always work with the grain when chiseling dovetails; a grain‑against cut raises the risk of tear‑out.
Next Steps: Building Confidence One Joint at a Time
If you’re still uneasy about tackling the hardest carpentry task, start small. Cut a few practice dovetails on scrap hardwood, measure every pin and tail, and note the effort required. Gradually increase the size of the pieces and move on to a simple drawer front. The incremental approach builds muscle memory, sharpens your eye for layout, and removes the intimidation factor.
Remember, the hardest task is just a collection of smaller challenges. Master each sub‑skill, and the big picture becomes manageable.
Frequently Asked Questions
Why do dovetail joints feel harder than mortise‑and‑tenon?
Dovetails require two opposing sets of cuts (tails and pins) that must interlock perfectly. Any tiny mis‑alignment creates visible gaps. Mortise‑and‑tenon, while also precise, involves only one cutting operation for the tenon and a single cavity for the mortise, making it slightly more forgiving.
Can a router replace a hand chisel for mortise work?
A router can remove bulk material quickly and achieve consistent depth, but it can’t clean up the final tenon shoulders or address grain tear‑out as cleanly as a hand chisel. The best practice is to rough out with a router, then finish with a sharp chisel.
What wood species are best for learning dovetail joints?
Hard maple and cherry provide a good balance of strength and chip resistance. They’re dense enough to hold a tight joint but not so hard that they wear down tools instantly. Avoid very soft pine until you’re comfortable with the technique.
How much tolerance is acceptable in a dovetail joint?
Professional cabinet makers aim for a 0.1mm to 0.2mm gap between pins and tails. Hobbyists often accept up to 0.4mm, but bigger gaps start to reduce the joint’s mechanical strength.
Is it worth investing in a CNC for complex joinery?
For production shops or serious hobbyists who need repeatable precision, a CNC can save time and reduce human error. However, the upfront cost is high, and learning the software adds another skill layer. Beginners typically benefit more from mastering hand tools first.


Write a comment